More about Click Command

Saturday, April 30, 2011

The golden rule of web application testing states that “You can find a number of bugs by simply clicking randomly on various places.” This is especially true for User Interface bugs. If you are using Selenium or Selenium-RC for automating your application’s User Interface tests, it is important to know how the “Selenium.click()” command works in order to simulate user clicks.

While it’s one of the lesser-advertised features of Selenium, it’s a blessing in disguise for testing application behavior for various UI elements without needing any manual intervention. For instance, we recently tested a JSP form with a few dozen dropdown lists (single and multi-select), checkboxes, and a plethora of radio buttons. Clicking each UI control manually was a pain in the hand. In contrast, simulating these clicks using Selenium not only saved crucial manual testing effort, it helped uncover a number of important bugs in the application as well.

How to use the Click command?

To put it in simple words, the click command emulates a click operation for a link, button, checkbox or radio button. It takes a locator (an identifier for which HTML element the command refers to) as an argument.

Example – The following command invocation simulates a click on a button element named btnSI


Browser Support

The Selenium click command works in the following browsers


Language Support

The Selenium click command works in the following languages.


Challenges and Workarounds

The Selenium click command offers basic locator click functionality. Though it has several limitations, these can be overcome using the following workarounds.

How to click on specific coordinates?
Click command is only capable of clicking on a specific element locator. It can’t click on an element using the coordinates of the mouse event relative to the element locator. Example


Moreover, it can be used to have the same effect as click command by specifying the coordinates as “0,0”. This is especially true when using JavaScript frameworks such as extJS and GWT where click command doesn’t work very well because it does not trigger the mouseUp event.

Does issuing the click command fire the onblur event?
No, it doesn’t. That’s the reason why you should use the fireEvent command in such cases. Example


HTML Code
Let’s consider the following example as a reference point to understand how the Selenium click command works.


Example Test Cases

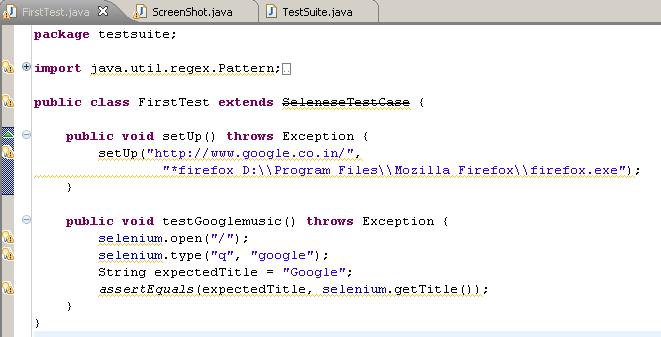
Let’s consider the following test cases to understand how the Selenium click command works in various languages. In each of the code snippets provided below, we first open the application root, set the value “selenium rc” into the field named ‘q’, invoke the click command on myButton and then wait for 30 seconds for the page to load.

Java Code


Python Code


Selenium IDE HTML Suite Test


Using Selectors with Click Command

The Click command can also be used in conjunction with the following selectors.

1. css=

The CSS selector is often used with Selenium click command to uniquely identify an object or element on a web page. For example


The CSS locator is especially handy as an alternative to XPath locator which works painfully slow with IE.

2. name=


As the name itself suggests, the name selector is used to click the first element with the specified @name attribute. For example

3. id=

This allows click on an element with the specified @id attribute. For example


4. link=

This allows clicking on a link element which contains text matching the specified pattern. For example


5. xpath=

This allows clicking on an element using an XPath expression. For example


We hope that you find this write-up informational and it helps shorten your Selenium learning curve.

eclipse start

Thursday, April 28, 2011

Launch Eclipse. A screen like this should appear, where you can choose which workspace to open.


The Launcher may not have this folder exactly but you can browse to it or type a 
similar name to create one (replacing the first xxx with your name and the second 
with the number of your course). Select Use this as the default and do not ask again.
If you do, Eclipse will automatically use this workspace next time you open Eclipse.
If you want to change the workspace later you can always go to File → Switch Workspace...
to be sent back to the Workspace Launcher window.You should now see Eclipse's Welcome screen:


Click on the arrow on the right to go to the workbench.


This is where you'll do most of your work in Eclipse.


Download Java software:

Tuesday, April 26, 2011

Access following location to download jdk 6.0 or later versions
http://www.oracle.com/technetwork/java/javase/downloads/index.htm
Click on “download JDK


In the next screen accept the license and choose the type of installer.


After clicking the link java JDK will be downloaded.

Program to access to Google page and do any search

Friday, April 22, 2011

1) Package structure


2) Junit class


note: download the java file Google search


3) Sever location


4) Running the server


5) Running Junit class


6) Test results

Program to access to Google and search for Google music and verify the strings

Thursday, April 21, 2011

1) Package Structure


2) Junit class to access to Google and search for Google music and verify the string
Google music.


note: download the java file Google music

3) Server location


4) Running server from command prompt


5) Running Junit Class


6) Test Results

Supported Programming languages

Sunday, April 10, 2011

Below languages are supported by Selenium RC.
•C# (DotNet)
•Java
•Perl
•Ruby
•Python
•PHP

Supported browsers

Selenium tools can run in following browsers.
•Internet Explorer
•FireFox
•Opera
•Safari
•Seamonkey


Selenium Overview

Selenium is a suite of tools to automate web app testing across many platforms. It is a GUI based automation tool. Initially it is built by ThoughtWorksThoughtWorks. It supports various browsers on various platforms
Selenium Projects
Selenium has many projects. Following projects are mostly used by testers.
1.Selenium IDE (IDE)
Selenium IDE can be used only in FireFox. It is an add-on for FireFox. User can record the actions and can edit and debug the tests. It can be used to identify IDs, name and XPath of objects. Only one test at a time.
2.Selenium Core (CORE)
Selenium Core is the original Javascript-based testing system. This technique should work with any JavaScript enabled browser. It is the engine of both, Selenium IDE and Selenium RC (driven mode), but it also can be deployed on the desired application server. It is used specifically for the acceptance testing.
User can record the tests using Selenium IDE and can use the same tests to run in other browsers with minimal modifications. It provides support to run the tests in HTA (HTML Applications) Mode. This mode works only in IE.
3.Selenium Remote Control (RC)
Selenium Remote Control is a test tool that allows user to write automated web application UI tests in few programming languages against any HTTP website using any mainstream JavaScript-enabled browser. User can write the tests (More expressive programming language than the Selenese HTML table format) in Java, DotNet, Perl, Ruby and PHP. Also it supports few testing frameworks.
4.Selenium Grid
Selenium Grid allows easily to run multiple tests in parallel, on multiple machines, in an heterogeneous environment by cutting down the time requirements

Test Suite creation in Junit4

Friday, April 8, 2011

First class:


Second class:


Test Suite:

Sample program to access the webpage and input values and submit

First Html page


Second Html page


Junit Class


Run the server


Run Junit Class


Test Results


Screen shot1


Screen shot2


note: download the scource files
one.html  |  two.html  |  ComboSelection.java

Develop sample Testing Project:

Thursday, April 7, 2011

Go to eclipse folder click on eclipse.exe to start eclipse.


Choose workspace location as shown below and click ok.


Create a package as shown below.


Add following jars to the project
--> selenium-java-2.0b2.jar
--> selenium-java-2.0b2-srcs.jar
--> junit-dep-4.8.1.jar

Here is the snap of sample project.


Start the selenium server before you run Junit Test case.


In the eclipse select the Junit and press "F11" button to run the test case.


Select as Junit Test and click ok. You will see the test results as shown below.


You have successfully ran your first test case.


Copyright © 2011 Mixx Blogger Template - Blogger Templates by BloggerReflex

Sponsored by: Trucks | SUV | Cheap Concert Tickets